A step-by-step guide on how to build a shed base
Have you decided to undertake a DIY shed installation to prep your garden for the summer? Or maybe your old shed base has weathered, and you need to replace it with a new one.
Whatever the case, Atlas Sheds are here to make this task easier to manage and navigate (because we know how difficult handy DIY tasks can be). When it comes to installing a shed base, there’s one thing you need to focus on above all: stability.
Without a sturdy, solid base, your shed has no chance of lasting. Luckily, there’s no single way to create a shed base. A range of various materials is available, depending on what type of ground you’re working with and the shed material.
Today, we’ll be walking you through how to create three types of bases:
- A concrete base
- A paving slab base
- A timber base
So, stick around if you want to avoid water damage, flimsy fittings, and rotting!
What base should you choose? A quick pick
Are you scratching your head over which type of shed base to choose? We’ve created a quick pick with the best base for various types of sheds and circumstances, so you can get stuck into installing it.
|
Base type |
Best for |
Typical prep depth |
|
Timber frame (bearers) |
Quick installs, uneven ground, and smaller sheds |
Minimal digging is needed if the ground is firm |
|
Concrete slab |
Large and heavy sheds, such as workshops and garden offices |
120 mm overall |
|
Paving slabs on sub-base |
Medium sheds and a neat, modern finish |
150 mm overall |
When picking a spot for your shed base, place it somewhere that will provide access to all sides of the shed, leaving space between walls and fences. A slightly shaded area that still receives ample sunlight throughout the day will help keep it dry and in good condition.
Just avoid areas with low-hanging branches or those prone to water pooling.
Ground preparation (all methods)
Before you begin anything, you need to make sure that the ground is stable and well-prepared for your sub-base to go on top of it. Without this, your base won’t last.
No matter what base you’ve decided on, the ground preparation is fairly similar.
1. Survey the area
Pick a datum (reference level) to use for your shed base, such as a nearby patio. Then, check how much your garden slopes by placing a long, straight edge or a tight string line over the base area to see how much it drops.
Before settling on a spot, check if there’s any chance of buried cables or pipes by using a basic cable/pipe detector. If there are, choose another spot that will provide good access to the shed and adequate sun exposure.
2. Mark out and square up
Now that you’ve chosen your spot, measure the footprint of the ground by placing four timber pegs in each corner and running a builder’s line between the pegs to outline the base.
Measure the diagonals to ensure the space is square rather than rectangular; if not, replace the pegs until both diagonals are equal. If you want to add a gravel border, mark an extra 100–150 mm around the footprint for drainage and access.
3. Strip and excavate
Now it’s time to remove all weeds, plants, and shrubs inside the marked square to leave a smooth layer of soil for the base. Slice under the grass at about 25–40 mm depth to lift the turf in strips.
Keep removing loose topsoil until you reach firmer subsoil. When digging, aim for the following:
- Timber bearers or plastic grids: usually a 50 mm scrape to firm ground.
- Paving slabs: dig 120 mm below finished height (sub-base + bedding + slabs).
- Concrete slab: dig 150 mm below finished height (sub-base + concrete).
Does the ground have a natural slope? You can fix any dips in the base by adding MOT Type 1 until the surface is level.
4. Improve the ground
Use the heel test to identify any poorly prepared areas. Stamp your heel around the area, and if the ground “pumps” or crumbles, dig that patch out by an extra 75–100 mm and lay a woven geotextile directly on the subsoil.
Then add MOT Type 1 in thin layers on top until the ground feels firm. If necessary, compact the ground with a tamper or plate compactor to prevent the base from shifting or sinking.
5. Add a weed barrier
To stop pesky weeds from growing back through the base, lay down a weed barrier (this will prevent them from making your shed look unruly on the outside).
A weed membrane is designed for use with plastic grids or paving slab bases and should be laid over soil that has been properly prepared. We suggest using a high-quality, non-woven landscape fabric and overlapping it by 150 mm to create a tight, effective barrier.

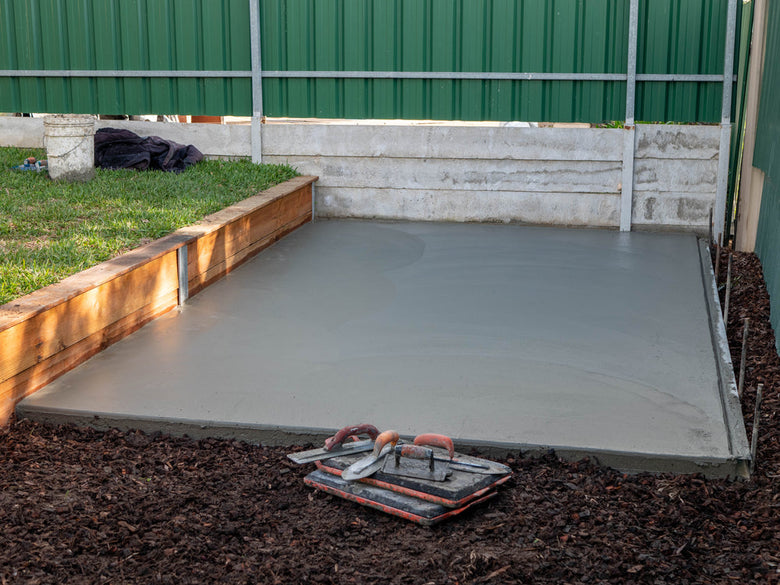
Method 1: A concrete base
Learn how to construct a sturdy concrete base for large and heavy sheds, such as garden rooms and garden studios, in just a few simple steps.
Tools and equipment
- Saw and screws for formwork
- shovel/rake
- Club hammer/rubber mallet
- Steel float, tamping board
- Timber for formwork (straight 100–150 mm boards) + stakes
- Ready-mixed concrete or bagged cement
- Polythene sheet and DPM
1. Build a wooden frame
Measure your timber and cut it to fit the size of the marked area (within the square you just prepared) with your saw. Secure the corners of the frame using screws or nails, and then place it on top of the compacted sub-base. Keep it in place by driving stakes into the ground.
Use a spirit level to make sure the frame sits level all the way around, as this sets the final height for the concrete.
2. Add reinforcement (optional)
Add a piece of reinforcing mesh (A142) inside the timber frame you just built to prevent the cement from cracking.
Prop the reinforcement slightly above the sub-base on small spacers.
3. Mix the concrete
Combine 1 part cement, 2 parts sharp sand, and 3 parts gravel/ballast in a mixer. Add small amounts of water gradually to the mix and continue turning until you achieve a thick consistency for the base.
4. Pour the concrete
Starting from one end of the frame to the other, slowly pour in the concrete mix and spread it out with a shovel or rake.
Using a hammer or mallet, gently tap the sides of the frame to remove any air bubbles, then use a straight timber to tamp across the top of the frame to level the concrete. You can use a rowel to smooth the surface further.
5. Cure the concrete
To retain the moisture, cover the concrete with a plastic sheet and allow it to cure for at least 7 days to reach maximum strength.
We suggest weighing the edges of the plastic sheet down with something heavy to prevent it from blowing off.
6. Remove the frame and check the levelling
After the concrete has cured, remove the pegs or stakes and dismantle the frame.
Using a spirit level, check the levelling of the shed to make sure it's flat and stable before building your shed on top of it.
A paving slab base
We’ve included some simple guidelines for creating a paving slab base for medium-sized storage sheds and potting sheds. This will achieve that classic patio-style look.
Tools and equipment
- Tape measure & string line
- Wooden pegs & builder’s line
- Rubber mallet
- Wheelbarrow
- Spade/shovel & rake
- Plate compactor or heavy hand tamper
- Spirit level & long straightedge
- Trowel
- Club hammer & bolster (if slabs need trimming)
- Stiff brush
1. Create the sub-base
Since you’ve already dug a depth of about 120 mm below the finished slab height, spread a layer of ≈50 mm MOT Type 1 across the area and rake till it’s smooth.
Compact it with a plate compactor, then add sharp sand or crushed stone 5-10cm deep in the marked area. Rake and lightly compact, then screed level with a straightedge. Use a spirit level to make sure it’s even.
2. Lay the paving slabs
Starting at the corner of the area, use a rubber mallet to lay and secure the slab into place, leaving a 1-2 cm gap between each to allow for jointing. Work outwards, laying the slabs in straight lines.
Use a spirit level to level each one, removing any sub-base material to ensure a flat surface.
3. Join the slabs
Combine 4 parts sharp sand: 1 part cement, and add water to create a thick and consistent base.
Then use a trowel to spread the mortar into the gaps between the slabs and smooth the mix using the back of the trowel. Use a brush to remove any excess mortar.
4. Allow the base to settle and check for level
Leave the base to settle for 24 hours, then use a spirit level to check that the ground is flat enough to build on.
Any minor high spots can be corrected with a mallet, but major dips usually mean lifting and relaying.
A timber base
Ideal for small garden sheds or those working with uneven ground, a timber base is a popular option for many homeowners.
Tools and equipment
- Tape measure & pencil
- String line & wooden pegs
- Spade/shovel & rake
- Wheelbarrow
- Plate compactor or heavy hand tamper
- Handsaw or circular saw (for timber)
- Drill/driver & wood screws
- Spirit level & long straightedge
- Rubber mallet
1. Create a sub-base (optional)
Spread a layer of gravel or crushed stone 5-10 cm deep within the marked area and compact it using a tamper. You should end up with a firm surface with no movement.
Use a spirit level to level the base.
2. Measure and cut the timber
Cut your timber bearers (we suggest using pressure-treated timber to prevent rot) to the measurements of your shed base to ensure correct fittings.
Use a circular saw to cut the timber, making sure they are straight and square.
3. Lay the timber bearers
Lay the first timber bearer at the corner of the area, spacing each bearer around 40-60cm apart.
Lay them perpendicular to the direction of the floor joists and use your string lines to keep everything straight and parallel. You can use a rubber mallet to adjust any bearers if necessary.
4. Level the bearers
Use a spirit level to add or remove any gravel or crushed stone from the sub-base if needed for flat levelling.
Aim for a ±10 mm tolerance across the entire base; this is close enough for smooth shed assembly.
5. Secure the bearers (optional) and check for level
Secure the bearers in place by driving wooden stakes into the ground on either side and screwing them to hold them steady.
Alternatively, you can use metal brackets or anchors on soft or uneven ground for a firmer hold. We recommend placing a damp-proof membrane strip on top of each bearer where the shed floor will be situated to prevent moisture from wicking into the floor timbers.
How big should the base be?
We recommend making the base the same size as the shed's width, or 25 mm smaller than the shed floor, to create a slight overhang that facilitates better water runoff.
If you’re placing your shed on timber bearers above the slab surface, then we recommend making the sub-base 30–40 mm larger than the shed floor.
Can I put a shed straight on gravel?
Gravel is a great sub-base for a shed base, as it offers excellent drainage. However, you’ll still need a structural element, such as bearers, grids, or slabs, so the floor is fully supported.
To help you out, we’ve created a guide all about installing a shed on gravel in your garden.
Are you ready to upgrade your garden?
At Atlas Sheds, we’re all about uncovering your garden's fullest potential.
We’ve been supplying and installing quality wooden sheds across the UK for over 30 years, with a wide range to choose from. Now that you know how to prepare the right base, the only thing left is choosing the shed that will make the most of it.
Browse our full range of garden sheds today and take the first step towards more storage, more space, and more enjoyment from your home. There’s something for every budget and style.